How to Move the WooCommerce Business Central Starter Kit from Test to Production
Many Power Automate for WooCommerce customers connect their store to Microsoft Dynamics 365 Business Central with our WooCommerce Business Central Starter Kit. This is a Power Automate solution that creates customers and sales orders in Business Central and keeps WooCommerce stock in sync with Business Central inventory.
The usual path is to import the kit into a test environment, adjust it, and try it against a sandbox company. Once everything works, the next question is: how do I get this into production?
This guide walks through that move. It assumes you know your way around Power Automate and Business Central administration.
Before you start
- The System Customizer or System Administrator security role in both Power Platform environments, so you can export and import solutions.
- A Business Central account with access to your production company.
- Admin access to the WooCommerce store production should use, with Power Automate for WooCommerce installed and licensed.
- A few minutes when you can place a test order on the live store.
Two kinds of “environment”
Most of the confusion in this move comes from the word “environment”, which means two different things here:
- Power Platform environment: where your flows live. You choose it with the environment picker in the top right of Power Automate.
- Business Central environment and company: where each Business Central step reads and writes data. You choose these inside each trigger and action, with the Environment name and Company fields.
Exporting and importing a solution moves your flows between Power Platform environments. It doesn’t change which Business Central environment and company the flows use. The starter kit saves those values inside every Business Central step, so updating them after the import is part of the move.
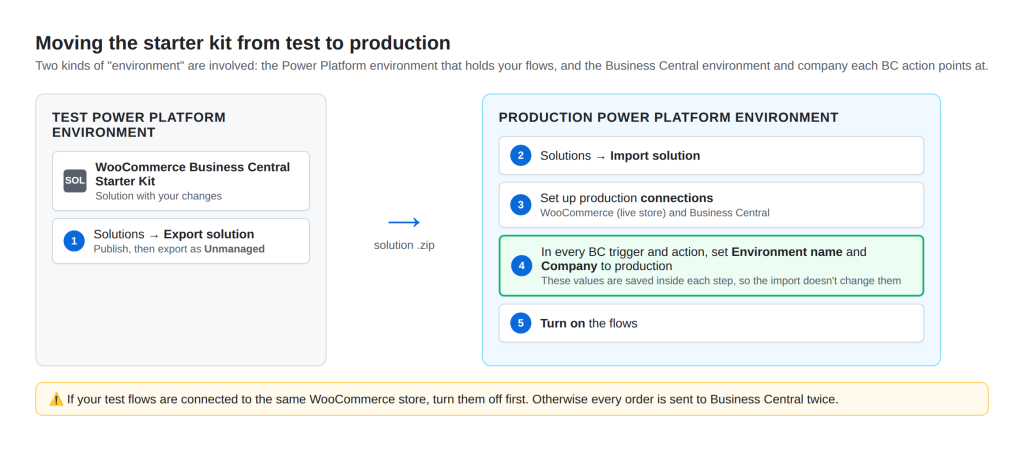
Step 1: Export the solution from test
- In Power Automate, select your test environment in the environment picker.
- Go to Solutions and select the WooCommerce Business Central Starter Kit solution, or the solution that holds your copy of the flows.
- Select Export solution. When prompted, select Publish so that all your changes are included, then select Next.
- Choose Unmanaged and select Export. A
.zipfile downloads when the export finishes.
Step 2: Import the solution into production
- Switch the environment picker to your production environment.
- Go to Solutions → Import solution, browse to the
.zipfile, and select Next. - Set up the production connections. For WooCommerce, choose or create a connection to your live store. For Business Central, choose or create a connection signed in with an account that can access your production company.
- Select Import and wait for the import to finish.
If your test flows used a WooCommerce connection to a staging site, this is where production switches to the live store. The WooCommerce steps take their store from the connection, so you don’t need to change them individually.
Step 3: Point every Business Central step at production
Open each flow in the imported solution. In every Business Central trigger and action, change Environment name (for example, from Sandbox to Production) and Company to your production values. Then save the flow.
Several of these steps are nested inside loops and conditions, so expand everything as you go. Any step you miss will keep reading from or writing to your test company. These are the steps to look for in each flow of the starter kit:
| Flow | Business Central steps to update |
|---|---|
| When a WooCommerce order is created, create sales order in BC | Get Customer from BC, Get customer record, Put customer record on Hold, Create SalesOrder, Find BC Item, Create salesOrderLine, Create comment line |
| When a Customer is created in WooCommerce, create customer in BC | Create customer |
| When Inventory Changes in BC, sync to WooCommerce | The trigger (When a record is created), Get itemRecordLedger, Find item |
| Manually update existing WooCommerce Products with Stock Quantity and Prices from Business Central | Get matching items, Find records |
If you renamed steps while customizing the kit, look for the Business Central icon instead of the names above.
Step 4: Check your production data
The flows match records between WooCommerce and Business Central. Data that lines up in your sandbox may not line up in production, so check these before you go live:
- Customers are matched by email. The order flow looks up the Business Central customer whose email matches the WooCommerce customer. If it doesn’t find one, no sales order is created. Customers created in WooCommerce after you go live are added automatically, but existing customers need matching emails in your production company.
- Products are matched by SKU. Each WooCommerce SKU must match a Business Central item number, and that item must not be blocked. Order lines whose SKU doesn’t match are skipped.
Step 5: Turn on production and turn off test
When you turn on a flow that uses the WooCommerce trigger, the connector registers a webhook in your store. If your test flows are connected to the same store as production, both sets of flows will receive every order, and every order will be created twice.
- Turn off the flows in your test environment if they use the same store.
- In production, open the solution and turn on the order, customer, and inventory flows.
Step 6: Test with a real order
- Place an order on the live store as a customer that exists in your production company, using at least one product with a matching SKU.
- Open the flow’s run history for When a WooCommerce order is created, create sales order in BC and confirm that the run succeeded.
- In Business Central, confirm that the sales order is in your production company. Its external document number is the WooCommerce order number.
If the order turns up in your sandbox company instead, a Business Central step still points at test. Go back to Step 3.
Doing this more than once?
If you’ll be moving changes from test to production regularly, replace the typed-in Environment name and Company values with environment variables. Each environment then supplies its own values during import, so you skip Step 3 entirely. This also makes managed solutions practical in production.
Need a hand?
The move itself is quick, but it’s easy to miss a step buried in a loop. If you’d rather not do it alone, reach out through our support page. We’re happy to support you through this and an engagement with us to resolve this is quick and easy.